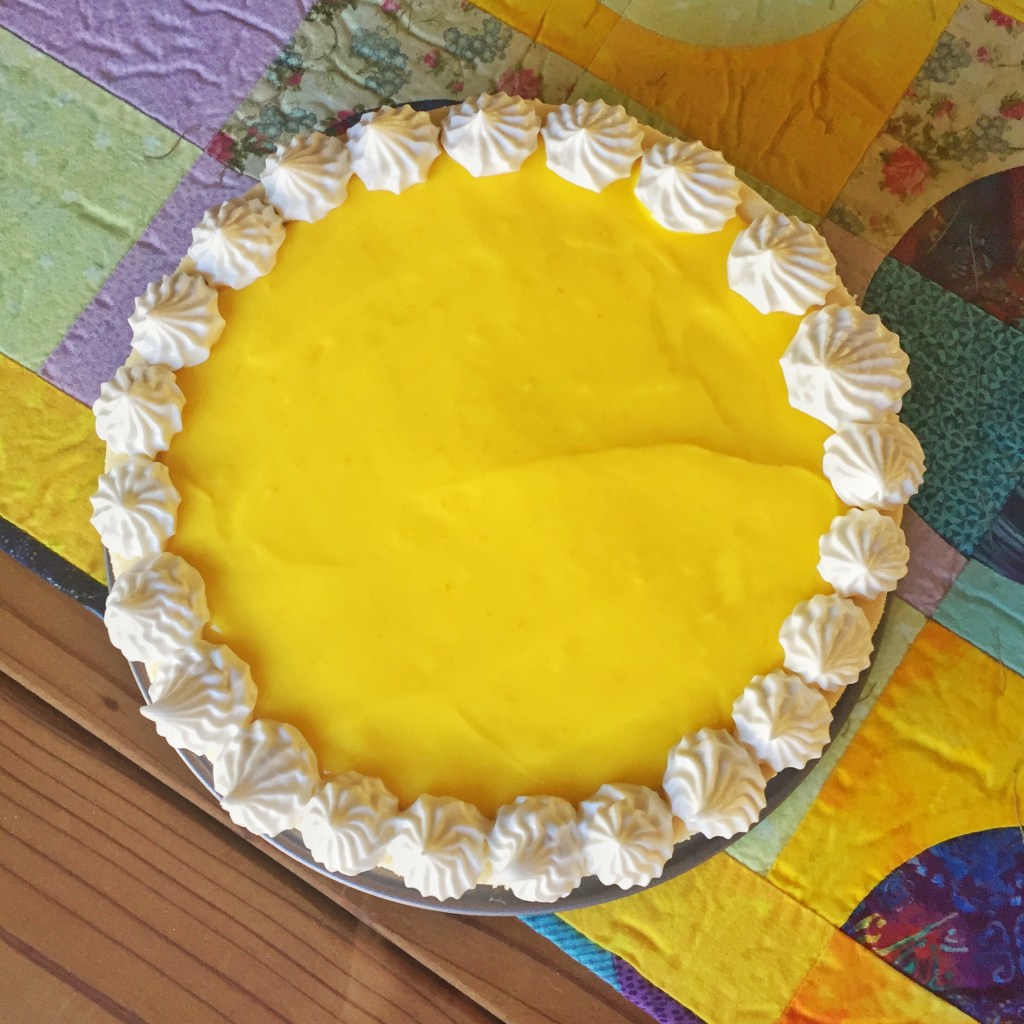
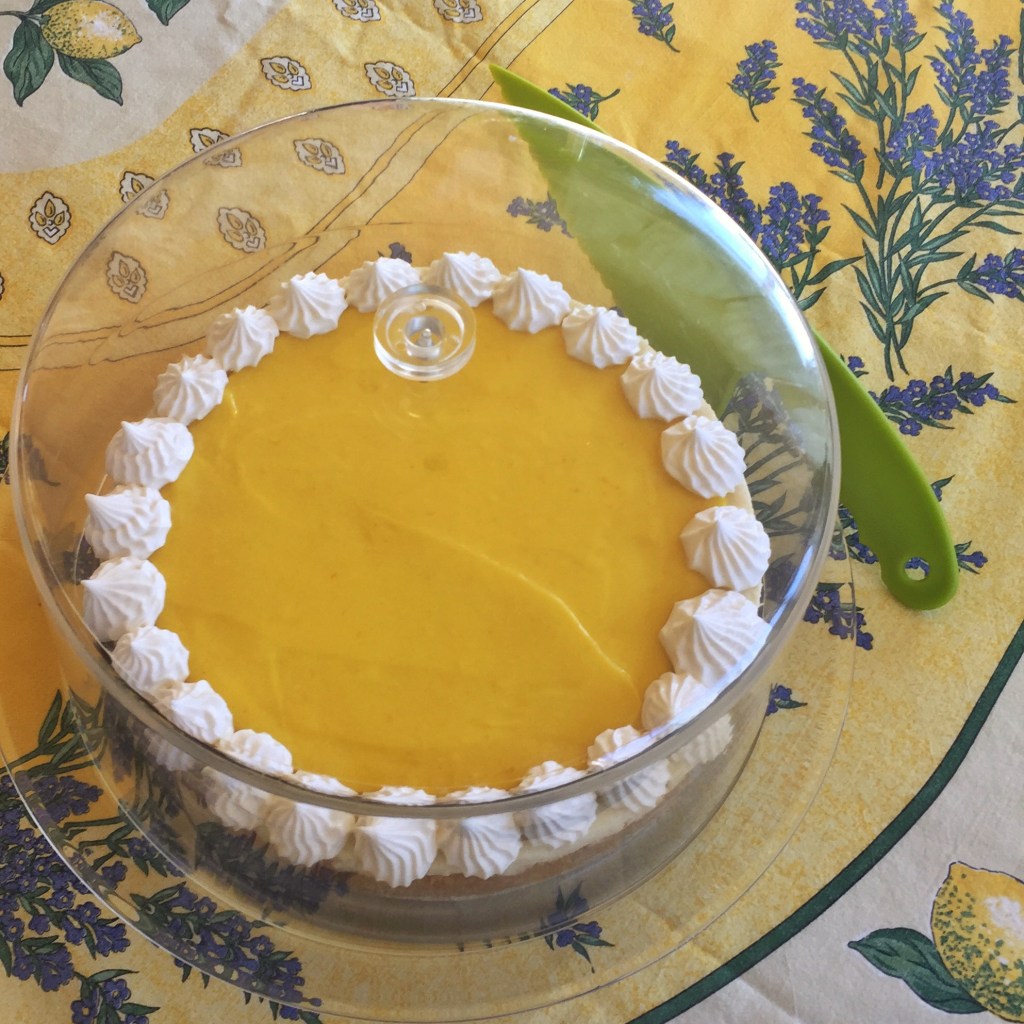
This year marks the ten year anniversary of the artists’ group, Colony of Coastside Artists, CoCA for short. To celebrate, I made a lemon curd cheesecake and brought it to our meeting.
The piped trim is sour cream buttercream frosting.The crust is the classic graham cracker crumbs with butter.I made lemon curd for the first time for this cake!I had never attempted cheesecake before and this was almost a disaster! I was using a no-bake recipe and couldn’t for the life of me get the filling to thicken up and set. I finally moved it to the stovetop and added agar agar.I was worried how it would turn out, particularly the texture, but it was well received at the CoCA meeting.
Congratulations to CoCA and especially Patt Sheldon who runs the group nearly single handedly! It’s been wonderful being part of the group and I applaud all the effort that goes into it.
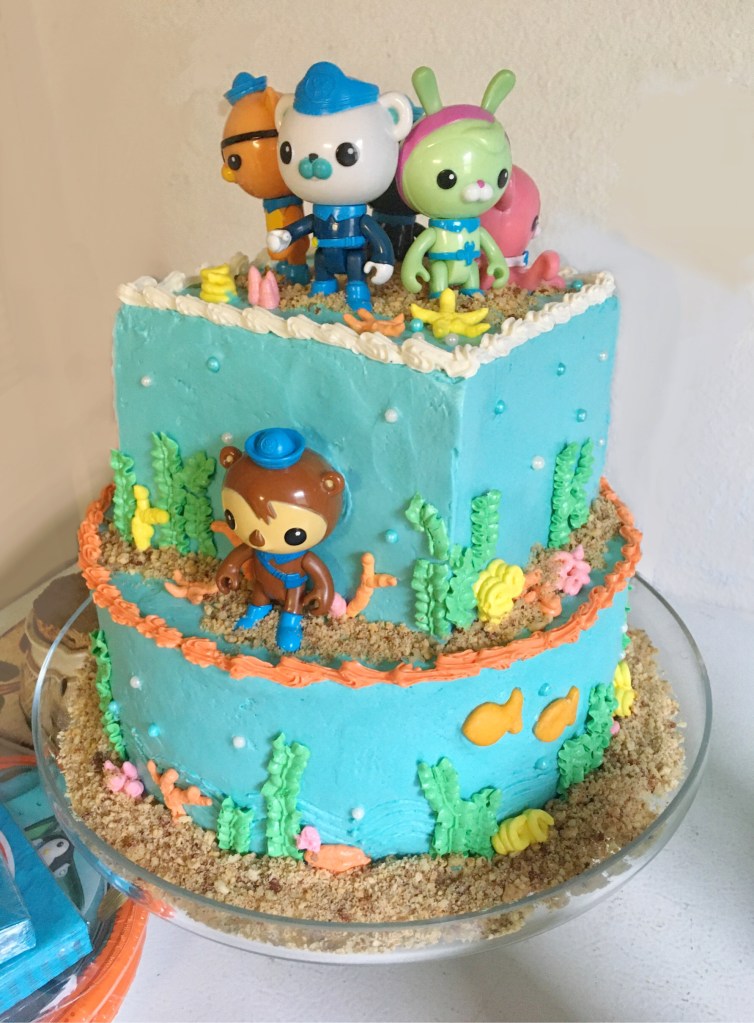
I made a chocolate cake for my nephew’s Octonauts themed party. It was a blast! (This is long overdue, as his birthday was back at the end of December, but better late than never.)
Devil’s food chocolate cake with chocolate cream cheese frosting inside is so yummy, this is the second time I’ve made it for his birthday cake. I also like to put chocolate bee bees in the cream cheese layers for extra chocolatey crunchies. The outside frosting is Swiss meringue buttercream.
Using the colorful meringue frosting, I piped out the corals, seaweed, and starfish and froze them a week ahead. Then the night before the party I simply placed them on the cake along with the toy characters. Such a time saver!
The “sand” is made from graham cracker crumbs mixed with finely chopped pecans. I couldn’t resist using Goldfish crackers for the cute fishes swimming around the cake.
Captain Barnacles is his favorite character.Assembling the cake layers with the chocolate cream cheese frosting.Professor Inkling is one of my personal favorites.I’m especially proud of the white and orange trims.
A little while ago, a good friend commissioned me to make an anniversary cake with a lapidary theme. I dove headfirst into the world of geode cakes!
This was the most challenging baking project I’ve ever attempted. When I started, I didn’t even know what fondant was or to how grow my own rock candy. I learned SO much from this project and made so many mistakes. It marks many firsts for me: my first square cake, first multi-tiered cake, and the first time I tried covering cake with fondant. Not to mention the first time I’ve ever made rock candy!
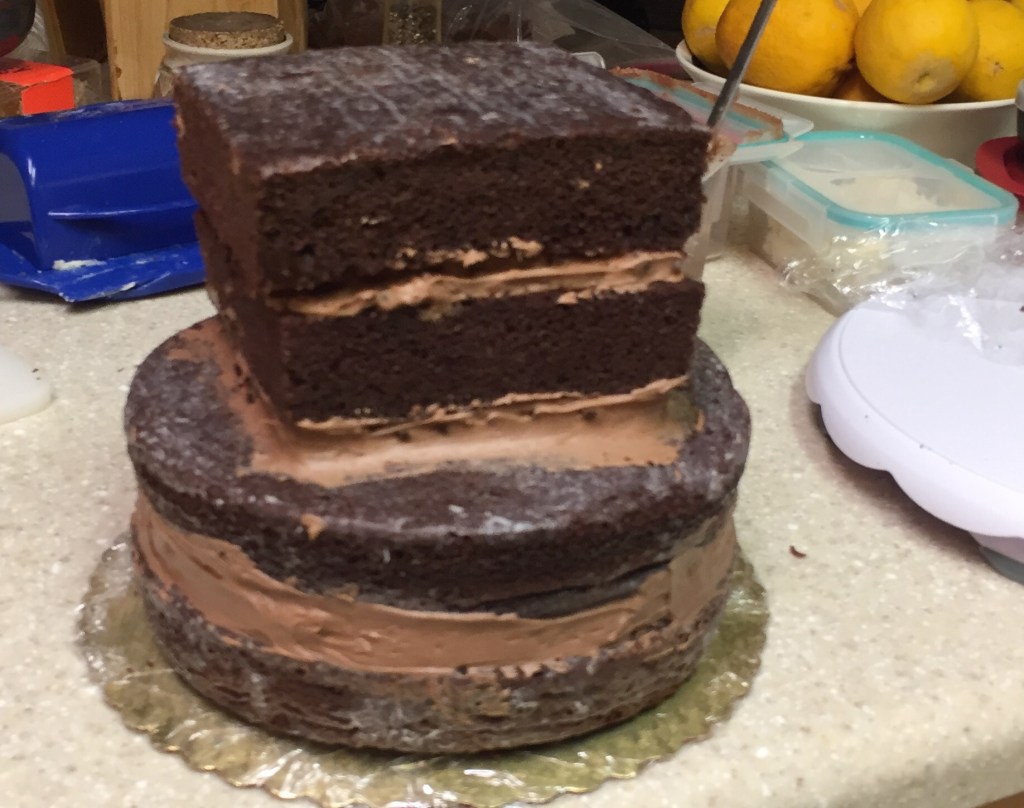
He also requested a flavor of cake I had never heard of before: apple cocoa with chocolate chips. Of course I had to make a test cake and sample it.
Here’s a pic of the cake before any frosting is applied.
Apple cocoa cake with chocolate chips without frosting. Scrumptious!
This cake is delicious! Walnuts and spices along with the apple give it an autumnal vibe and the chocolate chips push it over into ultra decadence. It’s a very dense cake and I needed to bake it for much longer than usual, but that crispy edge is what kept me coming back for more “sample” bites. Scrumptious!
I decided to pair it with inner layers of chocolate cream cheese frosting.
Chilling in the fridge.
Then I coated it with blue American buttercream frosting.
I love the rectangle shapes. Those blue blocks are so … Minecraft, heehee.
Blue ice block from the video game Minecraft
The American buttercream frosting naturally formed color variation as I alternated chilling the cake in the fridge and smoothing it.
Darker streaks in the American buttercream frosting developed as I chilled and scraped the cake smooth.
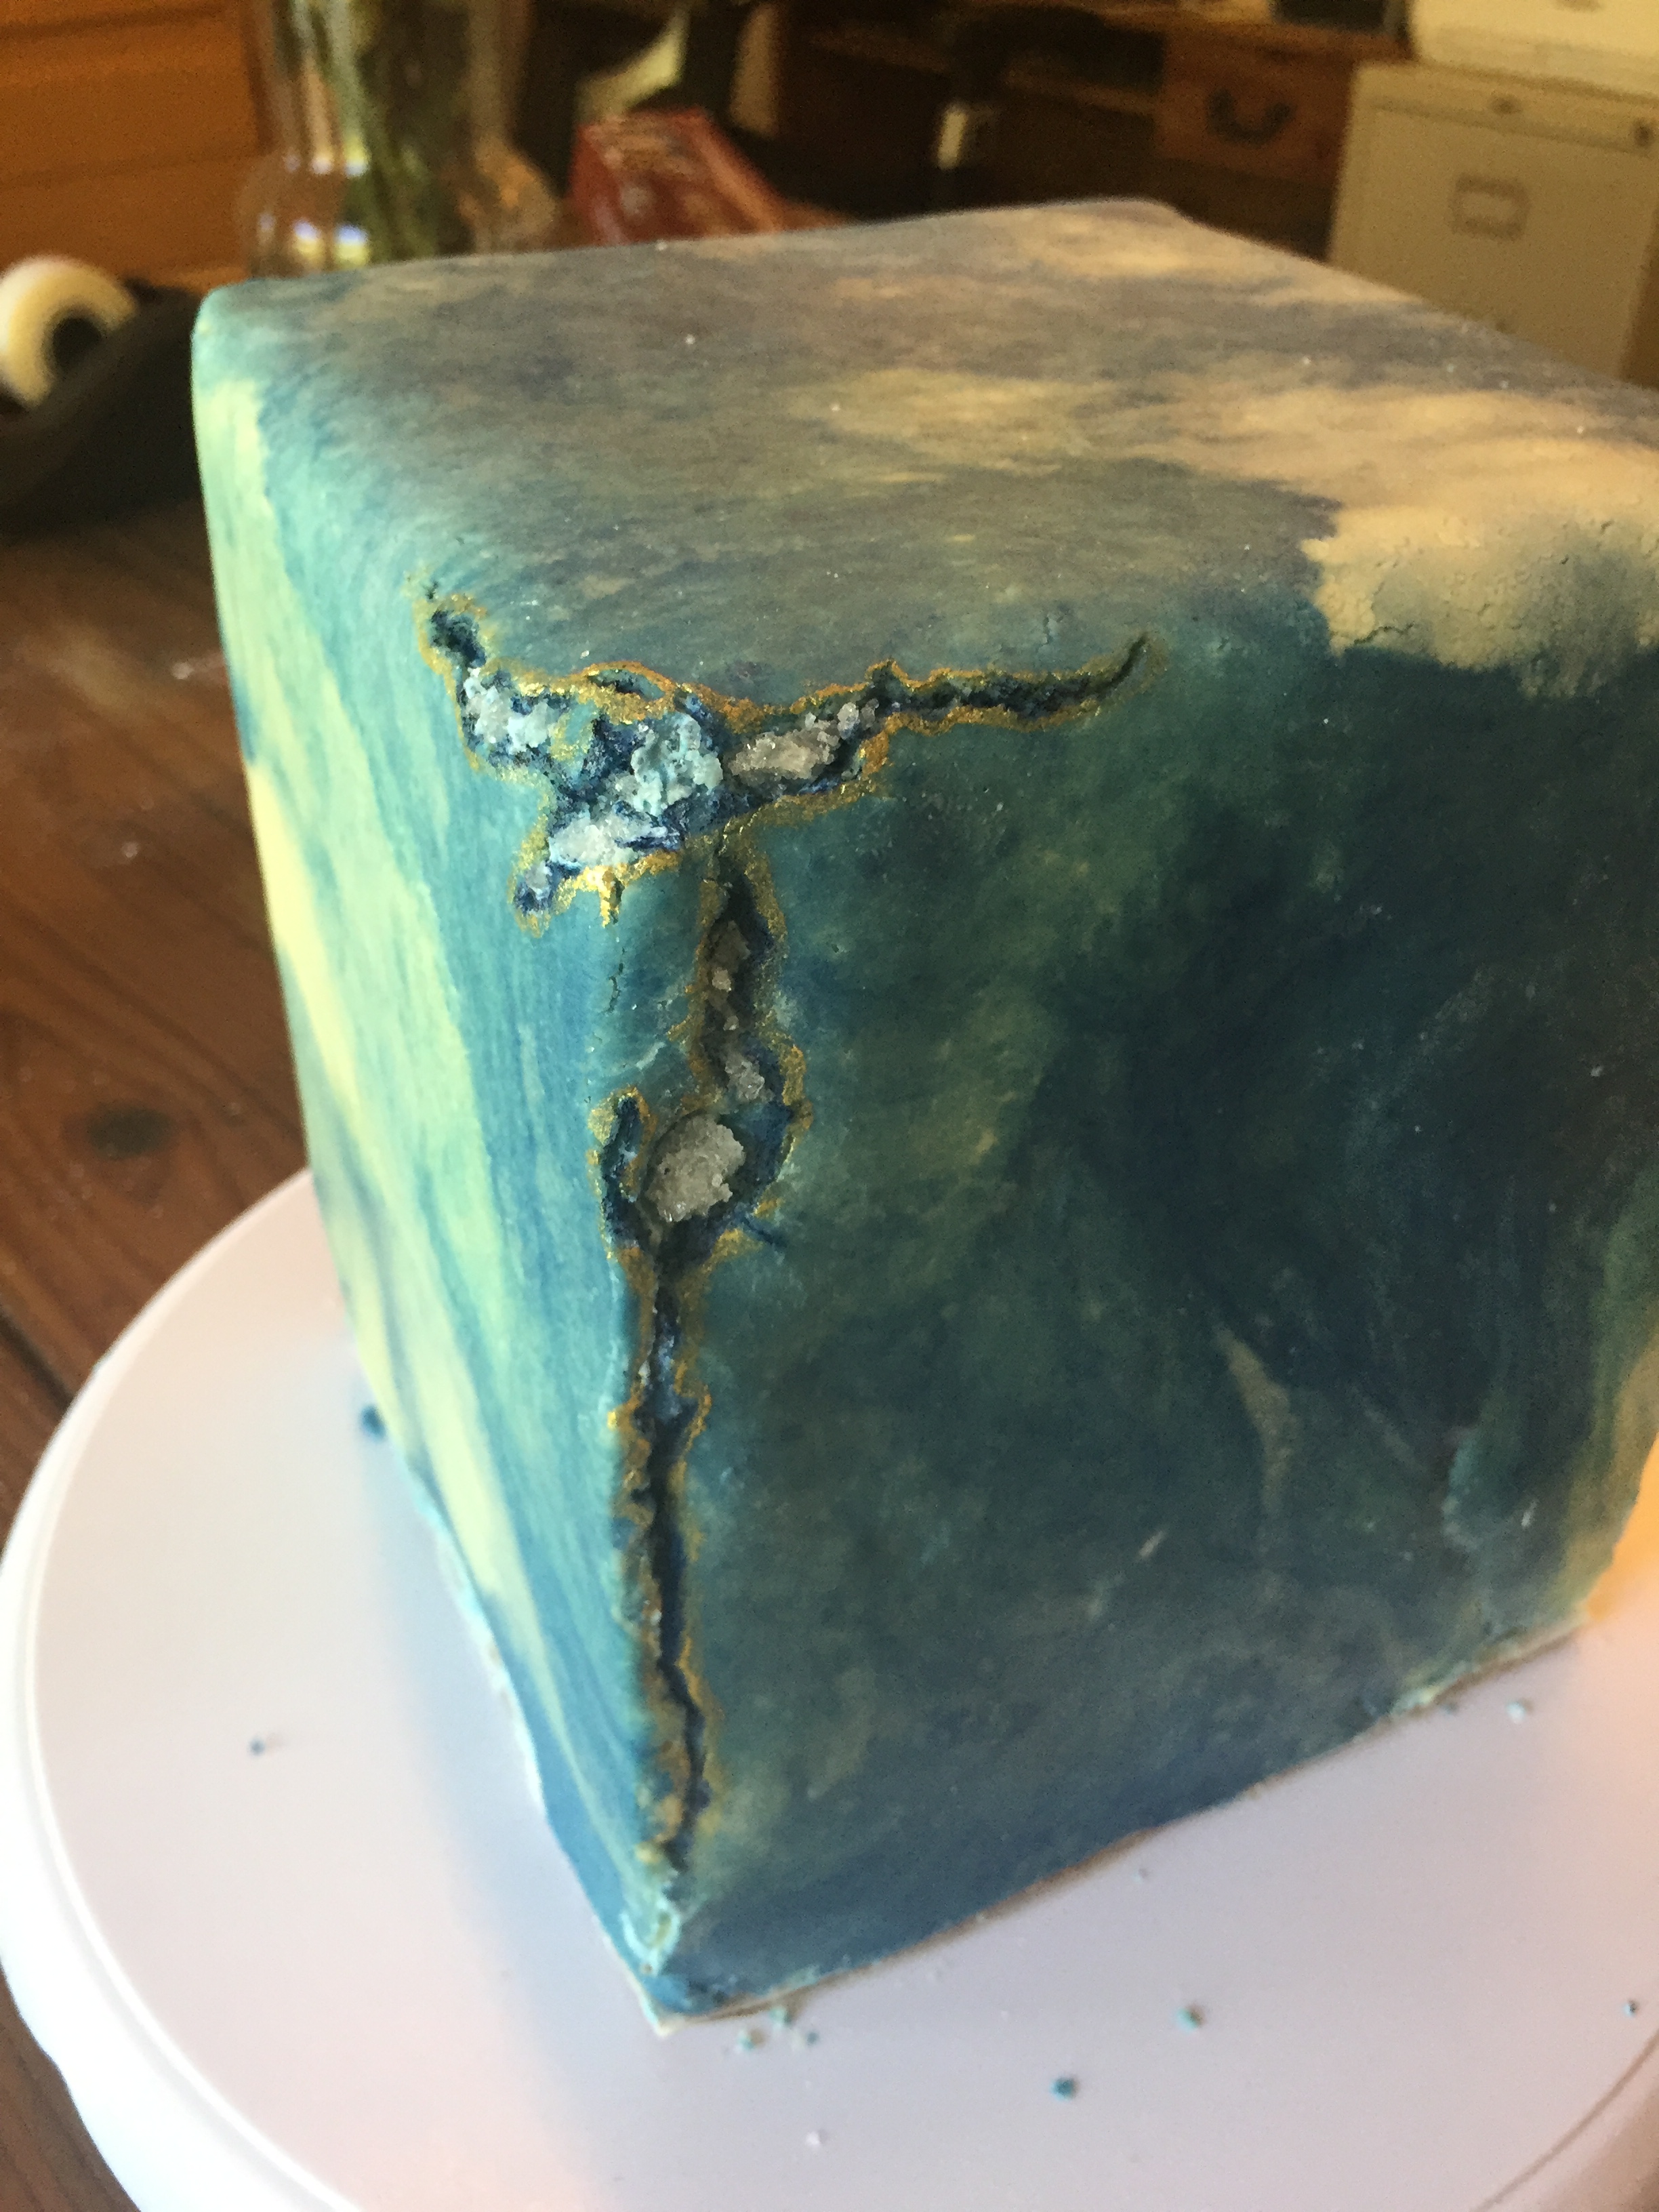
Next I started getting my fondant ready to drape on the top tier. Did you know there are several different types of fondant? I had no idea until I started this project. For this stage of the cake, I decided on a no-cook recipe for fondant that involves powdered milk, condensed milk, and powdered sugar. I kneaded half with blue food coloring and then twisted and swirled the two parts together to get a little bit of an agate ribbon effect. Then I draped it on the top tier, which was nerve wracking and resulted in many cracks.
Top tier with cracked fondant.
Fortunately, cracks go really well with geode stone cakes! I simply painted the cracks with dark blue and gold food coloring and pushed rock candy into the fissures.
I had the rock candy growing in my kitchen for a couple of weeks. Perhaps the high humidity where I live slows the process down, but it took much longer to get any substantial crystals than anything I had read online. I felt very lucky that I had started growing them when I did. I made two flavors: cinnamon to go with the spices in the cake and apple to go with … you guessed it, the apple in the cake!
I used that same powdered milk fondant recipe and swirl technique to make edible agate slices to place on top of the cake. The toothpicks help secure them into the cake.
I made a different fondant recipe (the traditional “basic” type made from cooking granulated sugar, water, and corn syrup — and a little bit of salt) as the base for the geode so the sugar crystals would have something granulated to grow from. I thought powdered sugar wouldn’t grow crystals — or at the least, not as quickly. Then I made a sugar syrup using coffee extract as the flavor and let it sit for three weeks inside the fondant geode shape. I wish I had photos of this process, but I was too worried to have the presence of mind to document it at all. The entire enterprise was a huge risky experiment! But here you can see when I finally installed the candy geode into the bottom tier of the cake after cutting a side of it and letting the syrup drain.
Candy geode set into the side of the cake.
Then I added supports and put the top tier on. It was over two feet tall! Definitely the biggest and heaviest cake I’ve ever made.
Blue lace agate cake
I added lots of home grown sugar crystals and food coloring to the cracks where the two tiers came together.
Details of rock candy and geode
My husband helped me deliver this pinnacle to the place of celebration. It was too heavy for me to carry!
Cake delivery!
Happy anniversary to Dave and Kathy! This was an incredible experience for me. I learned more — and made more mistakes — than I can put down in a blog post. Thank you so much for thinking of me! It was an honor to be part of your celebration. Edible lapidary is fantastic!
And thank you, dear readers, for following my delirious yet delicious journey as a baker.
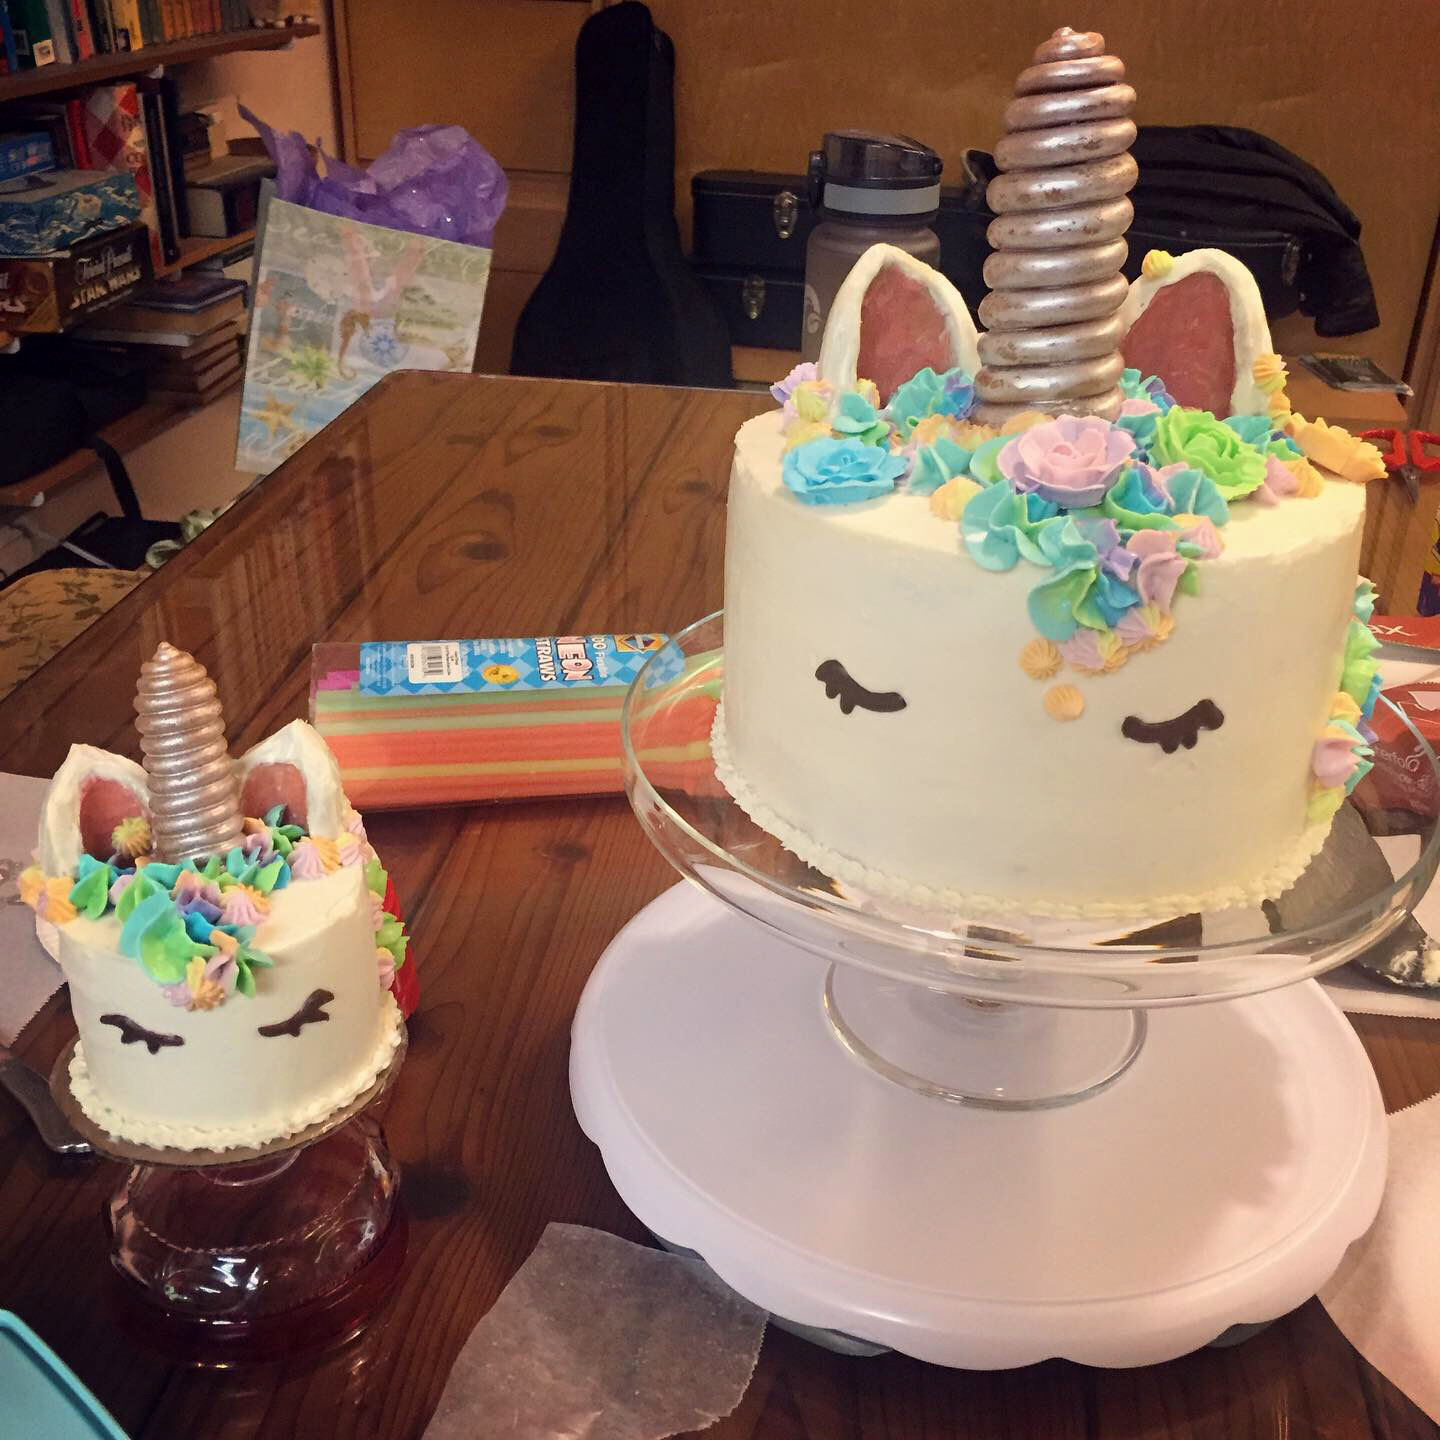
For my nieces’s first birthday party, I made unicorn cake! And a little unicorn smash cake for her.
It was really fun to make these. The ears and horns were made using a gingerbread house recipe. I made extra horns for fear they would break. Ha! That gingerbread is so tough it was hard to bite into them!
The ears were coated in white chocolate colored lightly with red food coloring. The horns were wrapped in store bought caramels that had been rolled into “snake” shapes. Once the “spiral” looked good, my husband then sprayed them with edible pearl paint.
The eyes and little heart on the back are melted dark chocolate. I dipped a toothpick into the melted chocolate and drew the shapes onto wax paper and chilled them in the freezer.
The flowers were made ahead of time, frozen, then placed on the cake the night before the party.
It was hummingbird and spice cake in alternating layers with a cream cheese cinnamon frosting inside. The outside is my favorite frosting: vanilla Swiss meringue buttercream. So smooth and fluffy!
This was my first time attempting the rainbow swirled frosting effect. It was fun! I’ll definitely be doing it for more cakes.
I made mine from a Devil’s Food mix, adding a tablespoon of cocoa powder and a teaspoon of vanilla extract. I also used butter instead of the 1/3 cup of oil that’s called for on the back of the box. To be completely honest, my husband actually put the batter together for me at my direction as I was painting the dinosaur posters (see below). It’s always wonderful to get a little help with these things. This is the largest cake I have ever made. The inner layers are slathered in this chocolate cream cheese frosting with chocolate beebees scattered on top to give a surprise chocolaty crunch. The green frosting is a Swiss meringue buttercream, which I had never attempted before. I doubled this recipe, Swiss Meringue Buttercream, with all the hints and it turned out so delightfully that I will definitely be using it again. It’s so fluffy, flavorful, and smooth. Scrumptious! It was fairly easy to work with too. The eyes, teeth, and arms are sugar cookies that I cute out by hand, adding food coloring to the arms to match the frosting color. The tail and party hat are frosted ice cream cones — another brilliant suggestion from my husband. He’s a keeper! Mini M&M’s provided the spots of color. Everyone loved the cake.
My sister had a bunch of fabulous party activities planned. The ring toss Triceratops and bean bag eating T-Rex were a hit with the kids and adults alike. I had fun painting them, too.
She also had adorable dinosaur temporary tattoos and dinosaur toy party favors.
My husband caught these two holding hands. The party spirit had spread to everyone, I think.
Happy Birthday, Kaleb! And a Happy New Year to everyone! I hope 2019 will be a wonderful year for us all.
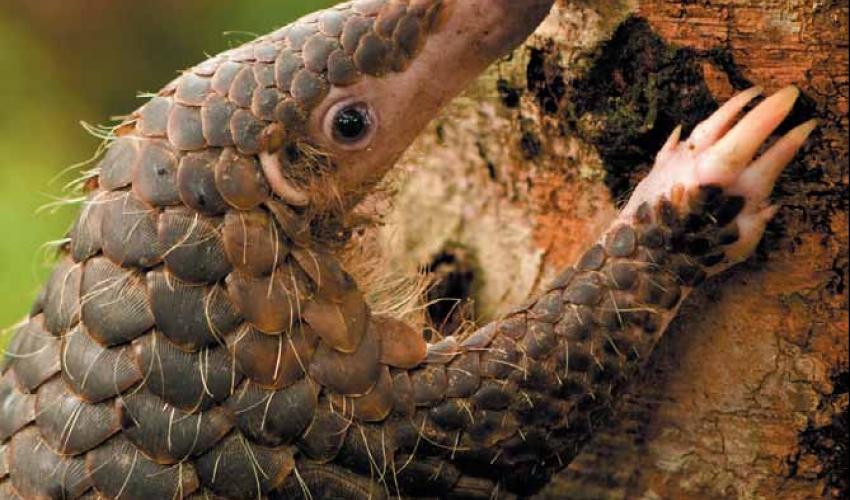
Pangolins are incredibly cool. It’s hard to believe they’re real. They look like mythical creatures with their dragon-like scales, huge talons, long sinuous tails and two-legged walking.
However fantastical they appear, pangolins are real. They are the only mammals with scales, which are made from keratin, the same material that make up your finger nails. When threatened, a pangolin will curl up into a well protected ball like a roly poly.
A pangolin rolled into a protective ball.
Even though they look similar to armadillos and aardvarks, they belong to the order Carnivora, which means they are more closely related to dogs, cats, and bears. There are four species of pangolin found in Africa and four found in Asia. The Asian species have hairs in between their scales.
Sunda pangolin, Manis javanica, with hairs between its scales.
Some species are arboreal with prehensile tails, like the Black Bellied Pangolin that can hold its entire body weight by its tail alone. The largest pangolin species, the Giant Ground Pangolin, can grow up to 1.8 meters long — that’s nearly six feet!
All pangolin species are extremely endangered. Pangolins are the most trafficked mammal in the world. They are hunted for their meat and their impressive scales, sometimes mistakenly believed to have medicinal properties.
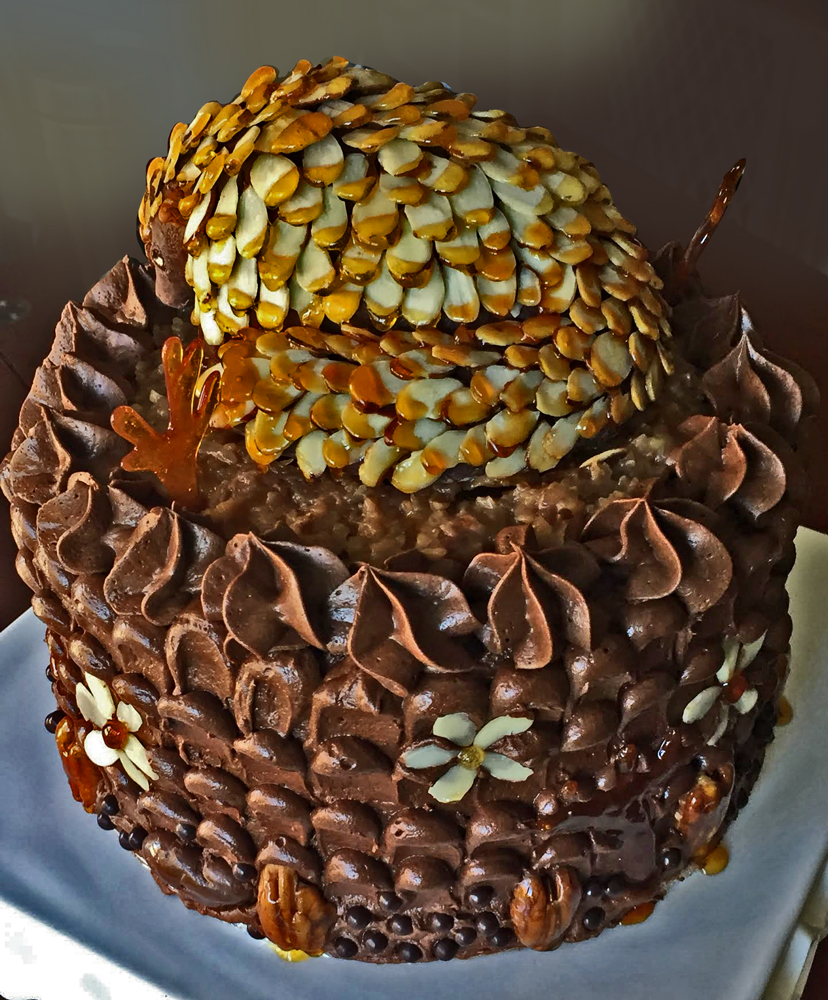
One of my best friends loves these unique animals, so to celebrate her birthday and raise awareness and simply glory in the wonder of the pangolin, I made her a chocolate pangolin cake. I also must give credit to Creature Conserve for giving me the idea on their Give Time page that mentions throwing a party themed around your favorite endangered animal. Let’s celebrate these precious animals!
For the pangolin itself, I used this recipe I found on Pinterest for fudge pine cones. Don’t they kind of look like pangolins already?
I used strong coffee to flavor my fudge in place of the almond extract and I mixed generous handfuls of pecan halves into the fudge as I worked it into the rough shape of a pangolin.
Fudge shaped into the pangolin before scales (almond slices) were added.
To make the pangolin scales that gorgeous amber color, I melted sugar on the stove till it caramelized and then I dipped each almond slice in the caramel. Time consuming but well worth it! I love how they turned out.
The eyes of the pangolin are also melted sugar. I spooned out the caramel and let it drip onto wax paper and when the droplets had cooled, I pressed them into the fudge. It was a lot like using glass beads in polymer clay. The fudge was a lot easier to work with than I was afraid. And it was delicious too!
The trees and flowers were made with the same method of dripping caramel off a spoon. It took several tries to find the right temperature at which to start dripping.
The cake is an augmented Devil’s Food cake mix with sour cream. The coconut and pecan filling is from The Best German Chocolate Cake on Tastes Better From Scratch. The chocolate frosting is a salty fluffy chocolate recipe I love to use on anything and everything. But the special ingredient in this cake is my homemade sauerkraut. That’s right, it’s a German chocolate sauerkraut cake! I know that’s not the traditional style of sauerkraut cake OR German chocolate cake, but I thought the texture of the fresh sauerkraut would blend perfectly with the shredded coconut and chopped pecans while giving the sweetness of the caramel a delicious kick of saltiness. Everyone at the party loved the taste of it just as much I did!
Now I want to try sauerkraut in so many more things…
I had to use special care when assembling this cake because the fudge pangolin was so heavy. My mother pointed out to me that I needed some kind of structure to hold it up. Five straws cut to the height of the cake and pressed in through the top with popsicle sticks laid across them provided the perfect scaffolding for the pangolin to sit upon. A throne, if you will, surrounded by cushions of chocolate frosting on a rug of coconut and pecan custard.
I had a lot of fun with this project. I’m excited to try more beautiful baking.
I am proud to celebrate my parents’ fiftieth anniversary this year. They have been through so much together. They have literally traveled the world together while raising five human beings, supported each other through hard losses, like the passing of my grandparents, and discovered themselves and their wildly different personalities together. It is hard to wrap my mind around. They are an inspiration to me.
My siblings coordinated to give them tickets to Hawaii, a place that, in all their travels, they have never visited together. I am so excited for them!
I illustrated a card for them and my wonderful word-smith husband composed a very moving and poetic commemoration inside.
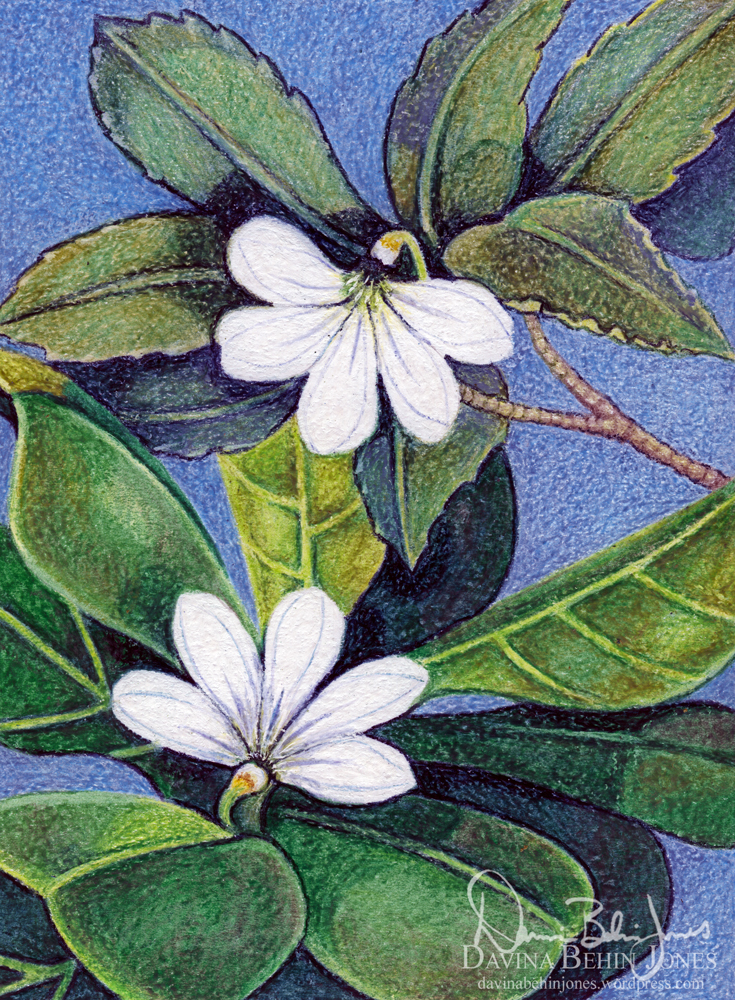
Naupaka Flowers, Crayola crayons on illustration artboard 9 in. x 12 in.
I used crayons to depict the naupaka flower, also known as the half-flower. They are found all over the islands, one variety thriving on the beaches, another in the mountains. There is a Hawaiian legend about two star-crossed lovers who end up turning into these separate varieties, each a half of the other. I wanted to show how different they are, one with spiny leaves, the other with smooth-edged leaves, and yet bring them together, almost as if they are gazing lovingly into each other’s faces.
Using crayons to make the tone reminiscent of Hawaiian print fabrics was very fun and satisfying.
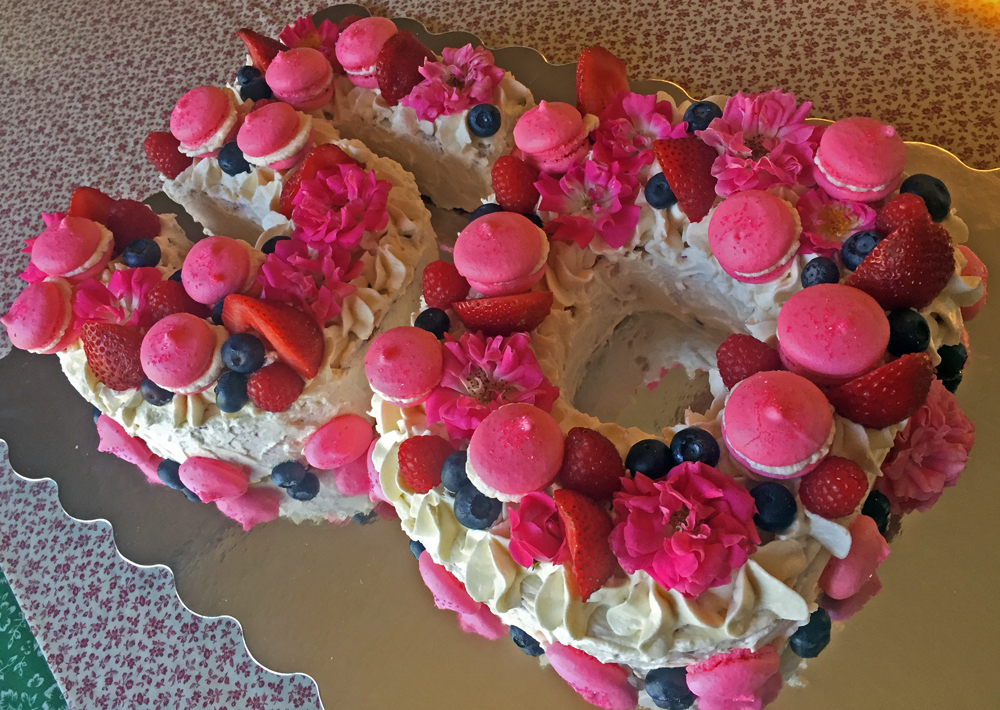
I also baked them a cake! The first romantic cake they ate together was a red velvet recipe my mother got from her mother. I used that same recipe and cut the cake into “50” to mark the occasion. I had never carved a cake before so I was nervous.
I baked macarons to go on top of the cake as a pretty decoration, like I’d seen on Pinterest. I’d never tried to make these before either. I’m glad they turned out tasty and a bright pink, though strangely small and all with little spikes on top. The roses are from the rose bush right outside my parent’s front door.
50 Anniversary red velvet cake decorated with macarons, roses, and berries.
Everyone enjoyed eating the cake. My parents were very touched and they are eagerly awaiting their trip to Hawaii!


